Thursday, August 29, 2013

Devil's Food Cupcakes - Show Your Team Spirit

On Saturdays and Sundays in the fall, this family watches a lot of football. This weekend marks the start of the season and everyone is pumped up.

I started trying last year to have a few more related items to turn to when it comes to food on those days. While I like to try to keep it healthy, every now and again, there's a game that comes along that requires something a little extra special.


I thought cupcakes were the perfect treat for the games - portable, and always customizable in your teams' colors! And bonus - I got to use my new decorating tip! Little things make me happy. 

These Devils Food cupcakes were just the ticket. They were moist and oh so chocolaty. I chose to use dark cocoa to deepen the color closer to black, since hubby's Bulldogs are red and black. The black went fine for my Jaguars, too, with white buttercream and teal sprinkles to round them out. 


 Here's hoping that his first game ends better than my team's preseason did!


 Feel free to decorate with your teams colors and show your spirit along with your sweet tooth!

Servings Yield: 24 cupcakes

price per serving: .47 per cupcake


Devil's Food Cupcakes

adapted from David Lebovitz

2/3 c. dark cocoa powder
1 1/2 c. flour
1/2 tsp salt
1 tsp baking soda
1/2 tsp baking powder
1/2 c. butter, softened
1 1/2 c. sugar
2 eggs
1/2 c. water
1/2 c. milk

sift dry ingredient together in one bowl

in another bowl, cream together the sugar and butter

add eggs, one at a time

mix water and milk

add a little of the milk mixture and fully incorporate, then add about 1/3 of the dry mixture

alternate wet and dry until all ingredients are used

place cupcake liners in a muffin tin and fill about 2/3 full with batter - about 1/4 c. each

bake at 350 for 15-20 minutes until done

cool on a cooling rack before decorating as you choose


Wednesday, August 21, 2013

Banana Roll With Peanut Butter Cream Cheese

I got this amazing deal on bananas, and now we have them everywhere. The first order of business when you are overloaded with bananas is always banana bread, isn't it?
Well, I wanted to try to be different this time.  With fall around the corner, the idea of a pumpkin roll has been floating around in my mind for a while, so I thought, what about a banana roll?


 The cake was light, spongy and moist, and could accommodate a number of filling flavors. I have a house full of peanut butter lovers, and peanut butter and banana go so well together, I thought, why not?


I think one of the biggest tricks to the success of this cake is the pureeing of the bananas - simply mashing them would not provide the right texture and you will end up with a mess on your hands. Send the bananas for a ride through your food processor or blender and douse them quickly with the lemon juice so it won't turn dark. A grayish cake is not very appetizing


 I'll admit, I think I would have enjoyed this with a plain cream cheese filling a little more, because for me, the peanut butter flavor overpowered the banana a bit too much. If you want the banana to shine through, I think the traditional cream cheese, or even a lemon flavored one, would be a better fit. That being said, it was still a fantastic flavor combination that I wouldn't hesitate to make again.

Servings Yield: 16 slices

Cost per serving: .30 per slice


Banana Roll With Peanut Butter Cream Cheese


for the cake:
  • 3 eggs
  • 1 c sugar
  • 3/4 c pureed bananas
  • 1 tsp lemon juice
  • 3/4 c flour
  • 1 tsp baking powder
  • 1/2 tsp salt
  • 1 tsp ginger
  • 1 tsp cinnamon
powdered sugar (needed for a towel, to keep the cake from sticking)


For the Filling:


  • 2 c powdered sugar
  • 1 8-ounce package of reduced fat cream cheese, softened
  • 4 tbsp light butter
  • 1 /3 c reduced fat peanut butter
  • 1 tsp vanilla
Powdered sugar for topping


Preheat oven to 375 F. In a large bowl, mix together eggs, sugar, banana (already mixed with lemon juice when pureed).
In a separate bowl, mix flour, salt, baking powder, cinnamon, ginger
Add the egg mixture to the flour mixture and stir until well blended.
Spray a 10 1/2" by 15" non-stick cookie sheet with cooking spray. Pour the batter onto the cookie sheet, spread evenly.
Bake 12-15 minutes or until a toothpick inserted into the center comes out clean.
Prepare a clean kitchen towel by sprinkling heavily with powdered sugar.
After baking, turn the cookie sheet onto the towel, the cake should slide out onto the towel. Starting at one end, roll up the cake into the towel. Cool 30-40 minutes.
For the filling, stir together the cream cheese, powdered sugar, peanut butter, vanilla and butter. Mix well.
After the roll has cooled, unroll it and spread the filling evenly. Roll back up without the towel. Wrap in foil or plastic wrap and refrigerate for at least an hour, or until filling is firm.
Sprinkle with powdered sugar before serving.

Tuesday, August 20, 2013

Caramel Apple Upside Down Cake

I was so excited when I saw Cooking Light's new special Baking Issue out on the stands. I immediately found a handful of recipes that I am dying to try, and with my mind on fall, I thought one with apples would be a perfect one to try first!


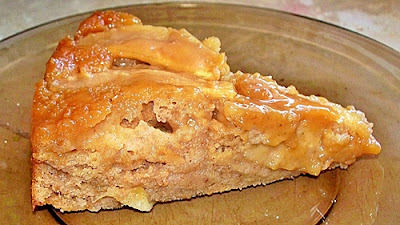
This cake not only tasted great, but came out so beautiful.  The amazing apple slices on top, with their caramel sheen....I didn't even want to cut it! But, with a three year old and a grown man both begging for a slice as the smell wafted through the house, I caved.


It tasted as good as it looked! It was so simple to make and looks like you spent so much time on it! Plus, its the perfect size for a smaller family like ours, since it is a single layer cake.


The cake is tender and lightly spiced, laying under a led of soft apples coated in a caramel glaze that gently drips down the sides, where you have a crunchy edge. If you like apples, its to die for.

Do yourself a favor, if you have a potluck or anything coming up in the next little while where you need to take something, make yourself a hero and whip up one of these. It will be a hit - I promise!

Servings Yield: 10 slices

Cost per Serving: .21 per slice


Caramel Apple Upside Down Cake


from Cooking Light

  • 1 to 2 granny smith apples, peeled, cored and sliced thin
  • 1/3 c. fat free caramel ice cream topping
  • 1/4 c. toasted wheat germ
  • 1/2 c. low fat buttermilk
  • 5 tbsp canola oil (I actually used olive oil & the cake was still light and moist)
  • 1 1/4 c. flour
  • 2/3 c. brown sugar, packed
  • 1/2 tsp cinnamon
  • 1/4 tsp salt
  • 1/2 c. applesauce
  • 1/2 t baking soda
  • 2 egg whites
  • 1 whole egg, beaten

Spray 9 inch round cake pan with cooking spray

Drizzle topping on bottom - it will not completely cover the bottom

Arrange apples slices over the caramel - slightly overlap them

Combine flour, wheat germ, cinnamon and salt

Combine buttermilk & baking soda in another bowl. Stir in applesauce and remaining ingredients

Add to the dry ingredients and combine well

Pour batter over the apples

Bake at 350 for 35 minutes

Cool for 10 minutes

Invert pan over a plate and take off the pan.

Friday, August 16, 2013

Cheesy Onion Flatbread Crisps

When you're not sure if you want a cracker or some bread to go along with your salad or soup, do I have the tastiest solution for you!


These little crisps are full of flavor and so easy to make! I made a few revisions to lighten the calories and fat, but they still came out great. 

Hubby inhaled them with sandwiches, soup, anything. I liked them as a quick snack. 


There are only a handful of ingredients and the dough comes together so easily. 

If you wanted a more uniform cracker look, you could roll a sheet of dough out and cut them into rectangles, but I liked the rustic look, and dividing the dough made it super easy to roll out thin enough.


If you like savory crackers, you really have to give these a try. You won't be sorry!

Servings yield - 8 servings, 3 flatbreads each

cost per serving - .50 for all three flatbreads combined


Cheesy Onion Flatbread Crisps

adapted from Biscuit Magic

2 1/2 c. reduced fat baking mix (like Bisquick - I used a store brand that I had on hand)
1/2 c, water
2 tbsp hot sauce (I used Franks Red Hot)
2/3 c. 2% milk shredded cheddar cheese
1/2 c. shredded Parmesan cheese
2/3 c. cheddar French fried onions, divided

mix 1/3 c. onions and remaining ingredients together and knead until the dough forms a ball.

divide into 24 portions and roll into balls (about the size of a ping pong ball)

roll out to about 1/16 inch thick and place onto a parchment lined cookie sheet

brush with egg white and sprinkle with additional onions, pressing them lightly into the dough

bake at 325 for 15-20 minutes until browned and crisp

Thursday, August 15, 2013

Pumpkin Spice Bagels

I had always wanted to make bagels, but I had a tendency to allow breads to intimidate me.  I still remember the weekend  I was paging through my newest copy of Healthy Cooking, I came across a Pumpkin Spice Bagel Recipe. I literally squealed. I knew it was time to face the beast. And guess what? I won!


The dough was a cinch - you mix it in a bread machine - what could be easier? Don't own a bread machine? It could easily be done by kneading the dough by hand or in a stand mixer for about 7-10 minutes, then allowing the dough to rise for about 60-90 minutes before shaping the bagels before boiling.


The dough is a bit sticky and hard to shape. Stretching out the rings can be challenging, but nothing close to impossible. Even in this raw state, they smelled amazing. But after I got them out of the oven? Oh man....


I could hardly wait to slice into one of these and didn't want to let them cool. But, my son was napping when I pulled them out of the oven and he loves bagels, so I knew he would be the one with the honor of taking the first bite...


He inhaled it. I could not have been happier with them. Soft and pillowy on the inside, and the perfect chewiness that you expect from a bagel on the outside. 

And the flavor? It'll make your tongue want to slap your brain out! I heard that back when I was watching Master Chef and have been dying to have a reason to say it, and these give me the right! The flavor screams fall so loudly that you will be deaf before you swallow your first bite.

Now, let's talk about money. You know you can wait a few months and run to your favorite bagel place for a pumpkin bagel. You also know you'll be paying through the nose for just one. What would you do if I told you you can make all 9 of these for less than you'll pay for one? 

Plus, if you're getting antsy for fall flavors, you can have these in your kitchen today - you'll only be waiting on your oven! 


In case you missed it --
Go.
Make these.
Now.
You won't be sorry.

Servings yield: 9 large bagels

Cost per serving: .20 per bagel 


Pumpkin Spice Bagels

from A Taste of Home Healthy Cooking

  • 2/3 c plus 2 tablespoons water (70° to 80°), divided
  • 1/2 c canned pumpkin
  • 1/3 c packed brown sugar
  • 1 tsp salt
  • 1-1/2 tsp ground cinnamon
  • 3/4 tsp ground nutmeg
  • 1/2 tsp ground allspice
  • 1/2 tsp ground cloves
  • 3 c bread flour
  • 1 pkg (1/4 ounce) active dry yeast
  • 1 egg white
  • 1 tbsp cornmeal

In bread machine pan, place 2/3 cup water, pumpkin, brown sugar, salt, spices, flour and yeast in order suggested by manufacturer. Select dough setting (check dough after 5 minutes of mixing; add 1 to 2 tablespoons of water or flour if needed).


When cycle is completed, turn dough onto a lightly floured surface. Shape into nine balls. Push thumb through centers to form a 1-in. hole. Stretch and shape dough to form an even ring. Cover and let rest for 10 minutes; flatten rings slightly.


Fill a Dutch oven two-thirds full with water; bring to a boil. Drop bagels, two at a time, into boiling water. Cook for 45 seconds; turn and cook 45 seconds longer. Remove with a slotted spoon; drain on paper towels.

Whisk egg white and remaining water; brush over bagels. Coat a baking sheet with cooking spray and sprinkle with cornmeal. Place bagels 2 in. apart on prepared pan. Bake at 400° for 15-20 minutes or until golden brown. Remove to wire racks to cool.

Wednesday, August 14, 2013

Triple Chocolate Cookie Brownies

Sometimes,  you want a cookie. 

Of course, brownies are never a bad idea. 

So when brownies met up with chocolate chip cookies and made the blog rounds some time ago, I of course made some. Sometimes, though, you want more chocolate, so in comes my idea of a chocolate chocolate chunk cookie nestled atop a dark chocolate brownie.....


 These turned out perfect. The brownie is fudgy, the cookie is chewy, the best combination ever.


They are chocolaty enough to satisfy the biggest chocoholic, but would make any cookie or brownie lover happy, too. They are unique enough to share at potlucks or just for a special treat at home. My men loved them...especially the littlest one. He's a brownieacholic like his Mama!


It seems like a long recipe, but its only because you're mixing the cookie and brownie separately. There is really nothing to getting it put together, and they are so worth it!

Servings Yield: 12

Cost per serving: .33 cents 

- a whole pan comes in at just under $4.00!


Triple Chocolate Cookie Brownies 

for the brownie: 

3/4 c. canola oil (or 1/4 c. melted butter and 1/2 c. oil)
3/4 c. all purpose flour
3 eggs
1 1/2 c. sugar
1/2 c. dark cocoa
1 tsp vanilla
1/2 tsp salt
1/2 tsp baking powder


blend sugar, oil and eggs until light, add dry ingredients and mix thoroughly

spread into the bottom of a greased 9 X 11 pan


for the cookies:

1 1/2 c. flour
1 egg 
1/2 c. light butter spread, softened
1/2 c. cocoa
1 tsp vanilla
3/4 c brown sugar
1/2 c sugar
1 c chocolate chunks

 
cream sugars and butter, add egg and vanilla


add dry ingredients and blend throughly, mix in chocolate chunks

place dollops across the top of the brownies and use a knife to swirl together

bake at 350 for 35-45 minutes, or until a knife inserted in the center comes out clean

Tuesday, August 13, 2013

Chocolate Cantaloupe Cake

Ever since I found a recipe for Cantaloupe Bread a few years ago, I have tried to come up with ways of incorporating it into other recipes.

I began to realize that the melon could be used in place of applesauce in recipes, and wanted to come up with a cake, since cantaloupe adds a sweetness that applesauce can't match, and seemed perfect for a cake.


Turns out, I was right on the nose...or taste bud - this is a wonderfully sweet, but not overly sweet treat, made lighter with less oil and less refined sugars. Now you really can have your cake and eat it too!


My son has done nothing but scream for cake for the last few days now, and hubby is happy to take slices in his lunch. I am not worried about the apparent overindulgence of either of my men thanks to the recipe. It came out of the oven moist and has stayed that way for the last three days, which tells me this is a keeper.

Tip: If you get hold of an overripe or mushy cantaloupe, remove the seeds and puree it and freeze it in 1-2 cup portions, then thaw it out when you are ready to bake - a perfect way to use an otherwise throw-away ingredient!


Servings Yield: 16 slices

Cost per serving:  less than .30 per slice


Chocolate Cantaloupe Cake


  • 2 1/2 flour
  • 1 tsp baking powder
  • 1/2 tsp baking soda
  • 1 1/4 c. sugar
  • 2 eggs
  • 1/2 c. cocoa (I used dark cocoa)
  • 1 tsp vanilla
  • 1/2 c. light butter spread (I used I Can't Believe Its Not Butter Light)
  • 1 1/2 c. cantaloupe pulp
  • 2 tbsp powdered sugar (optional to sprinkle on finished cake)


Drain the cantaloupe pulp in a colander to remove the water - it should have the consistency of applesauce and not be overly soupy

Mix the pulp with the butter and sugar

Add eggs one at a time and beat until well incorporated

Add vanilla

Add dry ingredients and blend thoroughly

Pour into a greased bundt pan and bake at 350 for 50-60 minutes

Turn out onto a plate to cool. Sprinkle with powdered sugar.

Sunday, August 11, 2013

Sweet Hawaiian Rolls

When I planned my menu for my Dad's Birthday Party, I envisioned a large, soft roll, reminiscent of the amazing King's Hawaiian Rolls that you can get at the store. You know, a little sweet, but so soft and delicious. I knew it would be great with pulled pork, not to mention other savory sandwiches.

 The more I looked for an online version, the more I realized this was going to be an experiment. The first batch were pretty good, but when I tweaked the second batch?


 Jackpot!


 These guys are so soft, so delicious. Just sweet enough to enhance the flavor of your favorite sandwich, but not so sweet that eating one warm and buttered would remind you of dessert.


My son inhaled one right out of the oven, and they were raved about by my whole family, in fact, they are still talking about them nearly a week later!


 I was so incredibly happy with them that I plan to divide them into smaller portions and use them as my Thanksgiving Dinner rolls. Don't let the size of the dough fool you, either, they rise substantially, which I am sure was part of the reason they were so soft and amazing. These guys stayed soft for days after baking, too - even the ones I pre-sliced for sandwiches!


If you enjoy the ones from the store, try these...I'll bet you'll like them even more!


Servings Yield: 

12  large rolls or 24 smaller dinner sized rolls

cost per serving: 

.16 per large roll .08 per dinner roll


Sweet Hawaiian Rolls


  • 3 c. flour
  • 3/4 c. pineapple juice
  • 1/4 c. light brown sugar, packed
  • 1 egg
  • 1/4 c. milk - warmed to 105-110 degrees
  • 2 tsp vanilla
  • 1 1/2 tsp salt
  • 1 1/2 tsp ginger
  • 1 pkg yeast (I used rapid rise yeast)
  • 1 egg beaten (for egg wash before baking)
 
add all ingredients to your bread machine and place on dough cycle 

check after 5 minutes - dough should be tacky to the touch:
  • if it's too wet - add 1 to 2 tbsp flour
  • if it's too dry - add 1 to 2 tbsp juice or milk
if you are not using a bread machine: knead the dough until pliable, adding extra flour as needed, about 7-10 minutes, then cover and allow to rise for 60-90 minutes, then proceed below

once cycle is complete, turn out onto a floured surface and divide into 8 equal parts *

shape into a rope about 1 inch in diameter and 7-9 inches long

tie a knot with the dough and tuck the ends into the center, placing the seam side down

cover and allow to rise for 1 hour

brush with egg wash and bake at 375 for 15-17 minutes, until browned


*if you're making dinner rolls instead of sandwich rolls, at this step, divide into 24 equal pieces, shape into balls, placing seam side down on a baking sheet and allow to rise, covered, for one hour, and bake as directed above.